SpringBoot缓存之基于API的Redis缓存实现
在 SpringBoot 整合 Redis 缓存实现中,除了基于注解形式的 Redis 缓存实现外,还有一种开发中常用的方式——基于 API 的 Redis 缓存实现。
数据准备
--
-- 数据库: `springbootdata`
--

-- --------------------------------------------------------

--
-- 表的结构 `t_article`
--

CREATE TABLE `t_article` (
  `id` int(20) NOT NULL COMMENT '文章id',
  `title` varchar(200) COLLATE utf8mb4_unicode_ci DEFAULT NULL COMMENT '文章标题',
  `content` longtext COLLATE utf8mb4_unicode_ci COMMENT '文章内容'
) ENGINE=InnoDB DEFAULT CHARSET=utf8mb4 COLLATE=utf8mb4_unicode_ci COMMENT='文章表';

--
-- 转存表中的数据 `t_article`
--

INSERT INTO `t_article` (`id`, `title`, `content`) VALUES
(1, 'Spring Boot 基础入门', '从入门到精通讲解...'),
(2, 'Spring Cloud 基础入门', '从入门到放弃...'),
(3, '点什么外卖呢', '老梁干挑面吧'),
(4, '肯德基疯狂星期四', '不是很便宜啊,炒作吧!');

-- --------------------------------------------------------

--
-- 表的结构 `t_comment`
--

CREATE TABLE `t_comment` (
  `id` int(20) NOT NULL COMMENT '评论id',
  `content` longtext COLLATE utf8mb4_unicode_ci NOT NULL COMMENT '评论内容',
  `author` varchar(200) COLLATE utf8mb4_unicode_ci DEFAULT NULL COMMENT '评论作者',
  `a_id` int(20) DEFAULT NULL COMMENT '文章关联的id'
) ENGINE=InnoDB DEFAULT CHARSET=utf8mb4 COLLATE=utf8mb4_unicode_ci COMMENT='评论表';

--
-- 转存表中的数据 `t_comment`
--

INSERT INTO `t_comment` (`id`, `content`, `author`, `a_id`) VALUES
(1,'写得什么玩意', '张三', 4)
(2, '你好帅', 'tom', 1),
(3, '很详细', 'kitty', 1),
(4, '他吃肯德基从来不是星期四', '马冬梅', 4)
(5, '这是网红店吧', '李四', 3)
(6, '写的不错喔,有前途', '周杰伦', 2);

--
-- 转储表的索引
--

--
-- 表的索引 `t_article`
--
ALTER TABLE `t_article`
  ADD PRIMARY KEY (`id`);

--
-- 表的索引 `t_comment`
--
ALTER TABLE `t_comment`
  ADD PRIMARY KEY (`id`);
在 MySQL 数据库中创建以上数据。
导入依赖
<dependency>
    <groupId>org.springframework.boot</groupId>
    <artifactId>spring-boot-starter-data-jpa</artifactId>
</dependency>
<dependency>
    <groupId>org.springframework.boot</groupId>
    <artifactId>spring-boot-starter-data-redis</artifactId>
</dependency>
创建实体类
import lombok.Data;

import javax.persistence.*;
import java.io.Serializable;

@Entity(name = "t_comment") // 设置 ORM 实体类,并指定映射的表名
@Data
public class Comment implements Serializable {
    @Id  // 表明映射对应的主键 id
    @GeneratedValue(strategy = GenerationType.IDENTITY)  // 设置主键自增策略
    private Integer id;

    private String content;
    private String author;

    @Column(name = "a_id")  // 指定映射的表字段名
    private Integer aId;
}这里创建一个评论的实体类,默认情况下,数据表中的字段对应实体类对象的属性,也可以用@Column注解指定数据表的字段名。并且用 Serializable 接口来实现 JDK 序列化机制,否则查询缓存时 Redis 会报错。
创建数据Repository
import com.syuez.springcache.entity.Comment;
import org.springframework.data.jpa.repository.JpaRepository;
import org.springframework.data.jpa.repository.Modifying;
import org.springframework.data.jpa.repository.Query;
import org.springframework.transaction.annotation.Transactional;

public interface CommentRepository extends JpaRepository<Comment, Integer> {
    /**
     * 根据评论 id 修改评价作者 author
     * @param author 评价作者
     * @param id 评论 id
     * @return 数据库受影响条目数量
     */
    @Transactional
    @Modifying
    @Query("UPDATE t_comment c SET c.author = ?1 WHERE c.id = ?2")
    public int updateComment(String author, Integer id);
}
编写数据库操作的 Repository 接口文件,该接口继承自 JpaRepository,其中<Comment, Integer>表示实体类和主键类型。
编写服务类
import com.syuez.springcache.entity.Comment;
import com.syuez.springcache.repository.CommentRepository;
import org.springframework.beans.factory.annotation.Autowired;
import org.springframework.data.redis.core.RedisTemplate;
import org.springframework.stereotype.Service;

import java.util.Optional;
import java.util.concurrent.TimeUnit;

@Service
public class ApiCommentService {
    @Autowired
    private CommentRepository commentRepository;
    @Autowired
    private RedisTemplate redisTemplate;

    public Comment findById(int commentId) {
        // 先从 Redis 缓存中查询数据
        Object object = redisTemplate.opsForValue().get("comment_" + commentId);
        if(object != null) {
            return (Comment) object;
        } else {
            // 缓存中没有,就进入数据库查询
            Optional<Comment> optional = commentRepository.findById(commentId);
            if(optional.isPresent()) {
                Comment comment = optional.get();
                // 将查询结果进行缓存,并设置有效期为 1 分钟
                redisTemplate.opsForValue().set("comment_" + commentId, comment, 1, TimeUnit.MINUTES);

                return comment;
            } else {
                return null;
            }
        }
    }
    public Comment updateComment(Comment comment) {
        commentRepository.updateComment(comment.getAuthor(), comment.getAId());
        // 更新数据后进行缓存更新
        redisTemplate.opsForValue().set("comment_" + comment.getId(), comment);
        return comment;
    }
    public void deleteComment(int commentId) {
        commentRepository.deleteById(commentId);
        // 删除数据后进行缓存删除
        redisTemplate.delete("comment_" + commentId);
    }
}首先使用@Autowired注解将 RedisTemplate 作为组件注入 Spring 容器,然后定义了findById()、updateComment()、deleteComment()三个方法,分别用于查询缓存、更新缓存以及删除缓存。当对数据进行缓存管理时,为了避免与其他业务的缓存数据混淆,对 Comment 数据缓存管理时,手动设置了前缀comment_。
关于 Redis API 中的 RedisTemplate 的更多用法,具体介绍如下
- RedisTemplate 是 Spring Data Redis 提供的直接进行 Redis 操作的 Java API,可以直接注入,相对于传统的 Jedis 更加简便。
- RedisTemplate 可以操作
<Object, Object>对象类型数据,而其子类 StringRedisTemplate 则是专门针对<String, String>字符串类型的数据进行操作。 - RedisTemplate 类中提供了很多进行数据缓存操作的方法,可以进行数据缓存查询、缓存更新、缓存修改、缓存删除以及设置缓存有效期等等。
上述示例中,redisTemplate.opsForValue().set("comment_" + commentId, comment, 1, TimeUnit.MINUTES);设置缓存数据的同时,将缓存有效期设置为1天时间(倒数第一个参数还可以设置其他时间单位,如天、小时、分钟、秒等等);当然,还可以先设置缓存有效期,再设置缓存数据。
编写控制器
import com.syuez.springcache.entity.Comment;
import com.syuez.springcache.service.ApiCommentService;
import org.springframework.beans.factory.annotation.Autowired;
import org.springframework.web.bind.annotation.GetMapping;
import org.springframework.web.bind.annotation.PathVariable;
import org.springframework.web.bind.annotation.RequestMapping;
import org.springframework.web.bind.annotation.RestController;

@RestController
@RequestMapping("/api") // 窄化请求路径
public class ApiCommentController {
    @Autowired
    private ApiCommentService apiCommentService;

    @GetMapping("/get/{id}")
    public Comment findById(@PathVariable("id") int commentId) {
        return apiCommentService.findById(commentId);
    }

    @GetMapping("/update/{id}/{author}")
    public Comment updateComment(@PathVariable("id") int commentId, @PathVariable("author") String author) {
        Comment comment = apiCommentService.findById(commentId);
        comment.setAuthor(author);
        return apiCommentService.updateComment(comment);
    }

    @GetMapping("/delete/{id}")
    public void deleteComment(@PathVariable("id") int commentId) {
        apiCommentService.deleteComment(commentId);
    }
}@RequestMapping("/api")作用于 ApiCommentController 类,该类的所有方法都将映射为/api路径下的请求。@Autowired用于装配 ApiCommentService 对象,方便调用 ApiCommentService 中的相关方法进行数据查询、修改和删除。
自定义 Redis 缓存序列化机制
虽然实现了 Spring Boot 整合 Redis 进行数据的缓存管理,但缓存管理的实体类数据使用的是 JDK 序列化机制,不便于使用可视化管理工具进行查看和管理(因为使用 JDK 序列化后,在 Redis 存储的缓存是以十六进制保存的)。这里我们通过自定义 RedisTemplate 和 自定义 JSON 格式的数据序列化机制进行数据缓存管理。
自定义 RedisTemplate
如果想要使用自定义序列化方式的 RedisTemplate 进行数据缓存操作,需要创建一个名为 redisTemplate 的 Bean 组件,并在该组件中设置对应的序列化方式。
创建一个 Redis 自定义配置类 RedisConfig。
import com.fasterxml.jackson.annotation.JsonAutoDetect;
import com.fasterxml.jackson.annotation.PropertyAccessor;
import com.fasterxml.jackson.databind.ObjectMapper;
import com.fasterxml.jackson.databind.jsontype.impl.LaissezFaireSubTypeValidator;
import org.springframework.context.annotation.*;
import org.springframework.data.redis.connection.RedisConnectionFactory;
import org.springframework.data.redis.core.RedisTemplate;
import org.springframework.data.redis.serializer.*;

@Configuration  // 定义一个配置类
public class RedisConfig {
    @Bean
    public RedisTemplate<Object, Object> redisTemplate(RedisConnectionFactory redisConnectionFactory) {
        RedisTemplate<Object, Object> template = new RedisTemplate<>();
        template.setConnectionFactory(redisConnectionFactory);
        // 使用 JSON 格式化序列化对象,对缓存数据 key 和 value 进行转换
        Jackson2JsonRedisSerializer<Object> jacksonSeial = new Jackson2JsonRedisSerializer<>(Object.class);
        // 解决查询缓存转换异常的问题
        ObjectMapper objectMapper = new ObjectMapper();
        objectMapper.setVisibility(PropertyAccessor.ALL, JsonAutoDetect.Visibility.ANY);
        /*
        enableDefaultTyping 方法从 2.10.0 开始标记为过期
        https://segon.cn/jackson-objectmapper-enabledefaulttyping-deprecated.html
         */
        objectMapper.activateDefaultTyping(LaissezFaireSubTypeValidator.instance, ObjectMapper.DefaultTyping.NON_FINAL);
        jacksonSeial.setObjectMapper(objectMapper);
        // 设置 RedisTemplate 模板 API 的序列化方式为 JSON
        template.setDefaultSerializer(jacksonSeial);
        return template;
    }
}上述代码使用@Configuration注解将 RedisConfig标注为一个配置类,使用@Bean注解注入一个默认名称为 redisTemplate的组件。在 Bean 组件中,使用自定义的 Jackson2JsonRedisSerializer数据序列化方式自定义一个 RedisTemplate,在定制序列化方式中,定义一个 ObjectMapper 用于进行数据转换设置。
效果测试
修改 application.properties
# MySQL Configuration
spring.datasource.url=jdbc:mysql://localhost:3306/springbootdata?serverTimezone=UTC
spring.datasource.username=root
spring.datasource.password=root#admin
# Display SQL Query
spring.jpa.show-sql=true

# Hikari Configuration
# minimum number of idle connections maintained by HikariCP in a connection pool
spring.datasource.hikari.minimum-idle=4
# maximum pool size
spring.datasource.hikari.maximum-pool-size=16
# maximum idle time for connection
spring.datasource.hikari.idle-timeout=600000
# maximum lifetime in milliseconds of a connection in the pool after it is closed
spring.datasource.hikari.max-lifetime=1800000
# maximum number of milliseconds that a client will wait for a connection
spring.datasource.hikari.connection-timeout=30000
# default auto-commit behavior
spring.datasource.hikari.auto-commit =true

# Tomcat Port
server.port=18443
server.address=localhost

# Redis Configuration
spring.redis.host=localhost
spring.redis.port=6379
spring.redis.password=
启动项目,项目启动成功后,通过浏览器访问 http://localhost:18443/api/get/3
查看 id 为 3 的用户评论,并重复刷新浏览器查看同一条数据信息,查看控制台打印的 SQL 查询语句:
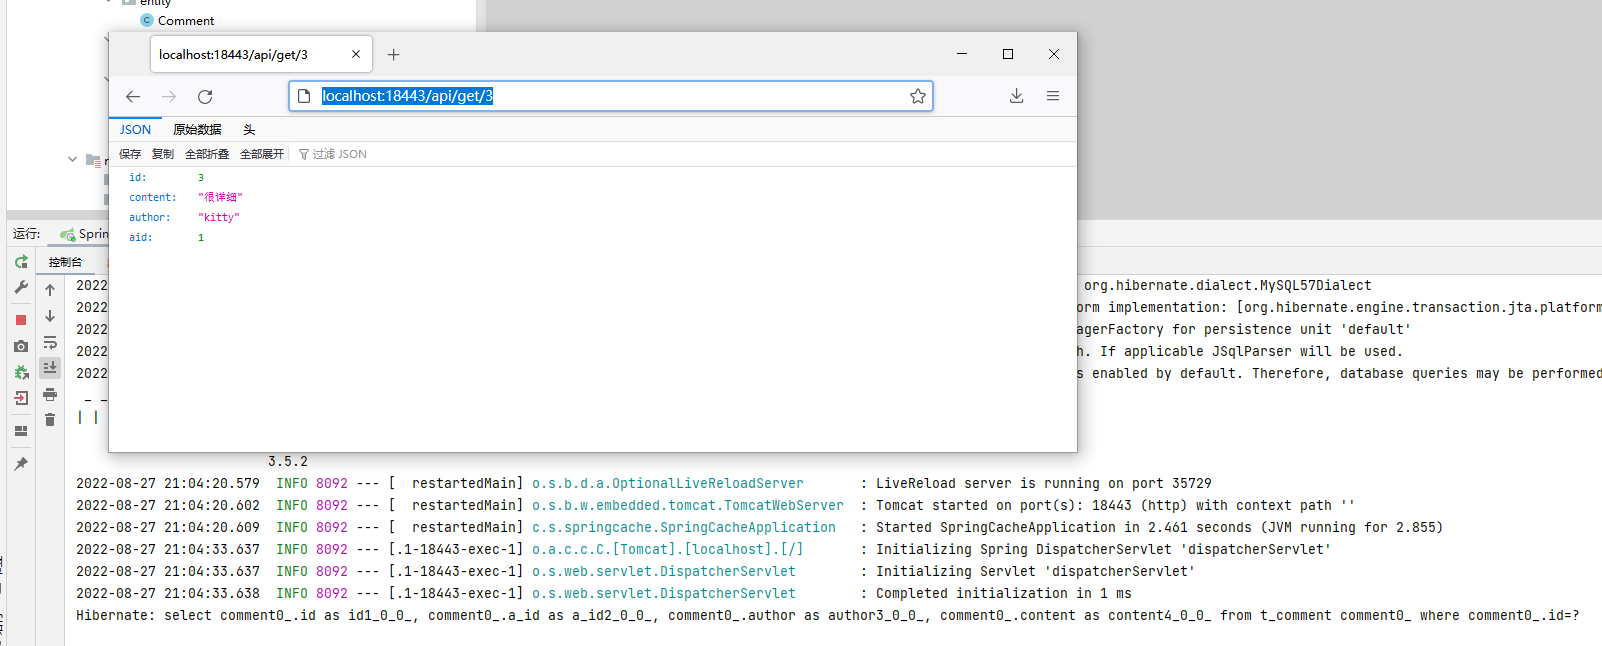
可以看出,执行findById()方法正确查询出用户评论信息 Comment;重复进行同样的查询操作,数据库只执行了一次 SQL 语句,说明定制的 Redis 缓存生效。
使用 Redis 客户端可视化管理工具查看缓存数据:
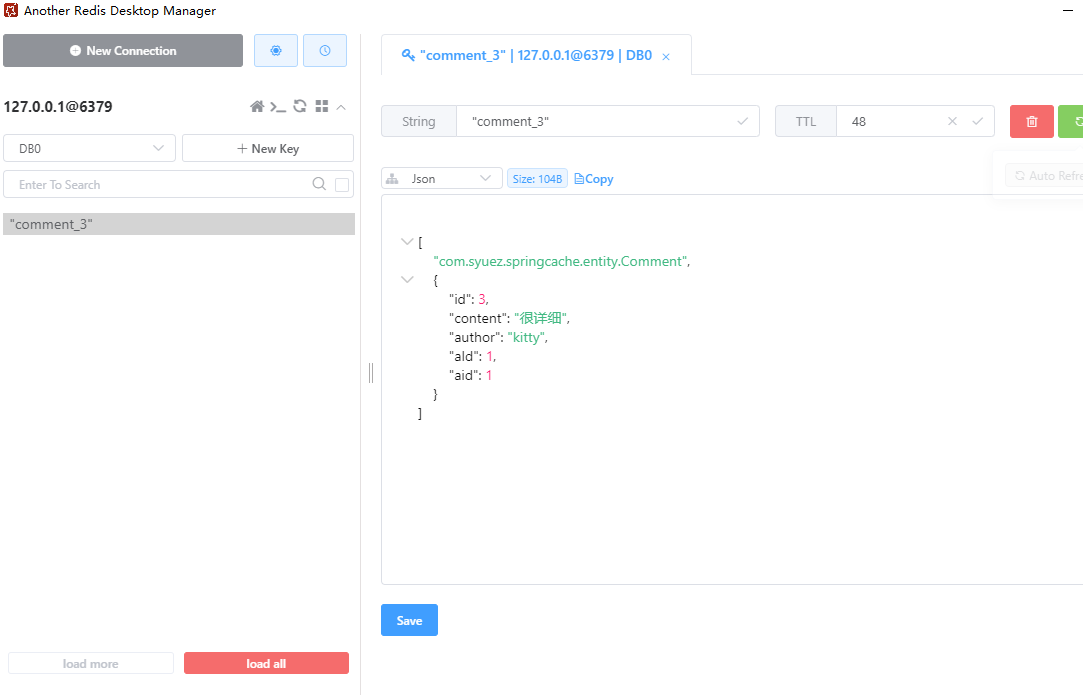
可以看出,执行findById方法查询出用户评论信息 Comment 正确存储到了 Redis 缓存中,且缓存到 Redis 的数据以 JSON 格式存储,说明自定义的 Redis API 模板工具生效了。
本文摘自《Spring Boot 企业级开发教程》